Create a Polaroid Effect of your Photo
Photos are often much more interesting when they are displayed like a Polaroid photo. Learn how you can turn your normal photo into something livelier, by adding a realistic Polaroid effect to it.
Creating the Base
1. Create a new blank canvas, say about 800×600 resolution, filled it with white [#ffffff] background.
2 Draw a rectangular in the middle, using Rounded Rectangular Tool with Radius: 2px. This will be the base for your Polaroid photo.
3. Double click on layer name to launch Blending Options, and insert these following effects:
Drop Shadow
- Opacity: 38%
- Spread: 0%
- Size: 5px
Inner Shadow
- Opacity:25%
- Distance: 0px
- Choke: 0%
- Size: 57px
Color Overlay
- Color: White [#ffffff]
Here’s how your output will look like.

Determining Image Size within Polaroid
Let’s determine how big our image will be within a Polaroid.
- Hold CTRL and left click on the Polaroid Base’s Layer Thumbnail to highlight the selection.
- With the selection highlighted, click Select -> Modify -> Contract.
- Insert 7px and click OK, you will noticed that the selection is shrink by 7px.
- Select Retangular Marquee Tool, Hold ALT and drag a smaller rectangular on the bottom to minus it off the selection.
- Create a new layer, call it " Photo Base" and fill the highlighted part with any color, say black, #000000 for instance. Hide the layer, we will use it as reference later.


Adding Image into Polaroid
- Just make sure you have the selection of layer Photo Base still highlighted, if not, hold CTRL and click on the layer to re-highlight it.
- Create a new layer on top of Photo Base, call it Photo.
- Look for your desired image, copy it and SHIFT + CTRL V to paste it. You will noticed the image will paste itself into the highlighted selection.
- Transform (CTRL T) or reposition until you are satisfied with the focus point.
Making Polaroid Image more Realistic
The photo looks a bit stiff to me at this stage. Lets tweak it so it looks that it looks more blending into the Polaroid.
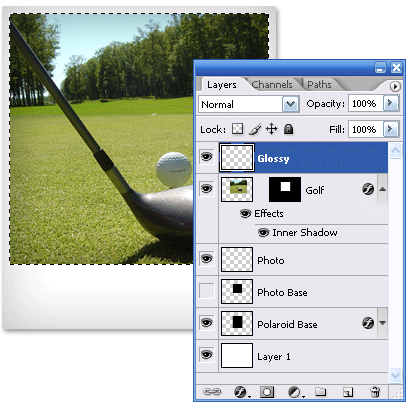
Double click on the "Golf" layer to call up the Blending Options and tweak the following styles:
Inner Shadow
- Opacity: 40%
- Distance: 0px
- Choke: 0%
- Size: 46px

Hold CTRL, left click on Photo Base layer’s thumbnail to highlight the selection, create a new layer on most top, call it "Glossy"

Select Polygonal Lasso Tool, Hold ALT and draw a rectangular like the image below to cut off half of the highlighted selection.

Fill the left over selected area with white [#ffffff] and adjust its Opacity to 18% or any figures as long it looks comfortable on the photo. Your output will look something similar to the image below.

Adding Text to Polaroid
The photo is almost done, add some writings. Fonts close to handwriting will be nice. Here’s my final output.
