10 Apple Notes Tips to Maximize This Note-Taking App
There are plenty of note-taking apps out there, from free versions to those that come with a price tag. But if you’re an Apple user, there’s one app that really stands out and has gotten better over the years: Apple Notes.
One of the biggest perks of using Apple Notes is its ability to sync seamlessly across all your Apple devices. This is super handy if you juggle between several Macs or iPhones.
So, before you dive into exploring other note apps, why not give Apple Notes a closer look? You might find that it has everything you need and more, saving you the hassle of downloading and switching between different apps.
In this post, I’ll share some tweaks and settings you can adjust in Apple Notes to make your daily note-taking smoother and more efficient, really boosting your productivity.
1. Add Lines or Grids to Your Notes
While a blank background is perfectly fine for typing text, those who use the Apple Pencil or prefer handwriting might benefit from some additional guidance. In Apple Notes, you can easily add lines or grids to your notes to help structure your writing.
To customize your note background with lines or grids, navigate to Settings > Notes, and select ‘Lines & Grids’. Here, you can choose from six different styles to suit your needs. However, it’s important to note that these changes will only apply to new notes you create; existing notes will remain unchanged.

2. Add Media to Your Notes
One of the standout features of Apple Notes is its ability to seamlessly integrate media into your notes. Whether it’s photos, videos, or documents, you can quickly add these directly from your device. Utilizing your device’s camera, you can take a photo or record a video on the spot and attach it directly to your note.
To add media, open the note you want to enhance, click on the triple dot icon, and then select ‘Camera’. Choose ‘Take Photo or Video’ to capture new media, or select ‘Scan Documents’ if you want to scan a document. The ‘Scan Documents’ option provides a clear, black-and-white version of the document, making it easy to read and incorporate into your note.

3. Password Protect Your Notes
Some of the notes you create may contain sensitive information that you want to keep secure, ensuring that even if someone has access to your phone, they cannot open these notes without your permission. Apple Notes offers the ability to lock your notes using either your device’s passcode or a custom password of your choice.
To set this up, go to Settings > Notes, and under Passwords, you can choose to either ‘Use Device Passcode’ or ‘Use Custom Password’.

Then, to lock a specific note, simply go to the note, click on the triple dot icon at the top, and select the Lock icon. This extra layer of security helps ensure that your private information remains confidential.

4. Customize How Your Checklist is Sorted
When you create a checklist in Apple Notes, any item you check off automatically moves to the bottom of the list, keeping unchecked items at the top. This setup is great for focusing on what’s left to do, but it might not work for everyone.

If you prefer to keep checked items in their original position instead of moving them to the bottom, you can change this setting. Head over to Settings > Notes, look for ‘Sort Ticked Items’, and switch it from ‘Automatically’ to ‘Manually’. This adjustment means that when you check an item off, it stays right where it is, helping you maintain the context of your list.

5. Change How Notes Are Sorted
In the Apple Notes app, notes are usually sorted by the date they were last edited, which means if you revisit and modify an older note, it will automatically move to the top of your list. This setup is usually convenient as it allows you to easily access the most recently updated notes.
However, if this sorting method doesn’t suit your preferences, Apple Notes offers alternative options. You can also sort your notes by the date they were created or by their title. To change your sorting preference, go to Settings > Notes, tap ‘Sort Notes by’, and select the option that works best for you.

6. View All Notes in Gallery View
Typically, all your notes in the Apple Notes app are displayed in a list view, organized line by line. If this isn’t quite your style, you might prefer the gallery view. In gallery view, each note is presented as a small thumbnail, providing a quick visual preview of what’s inside each note.
To switch to this view, open the Notes app, click on the triple dot icon at the top, and then select ‘View as Gallery’. This visual arrangement can make navigating through your notes faster and more intuitive.

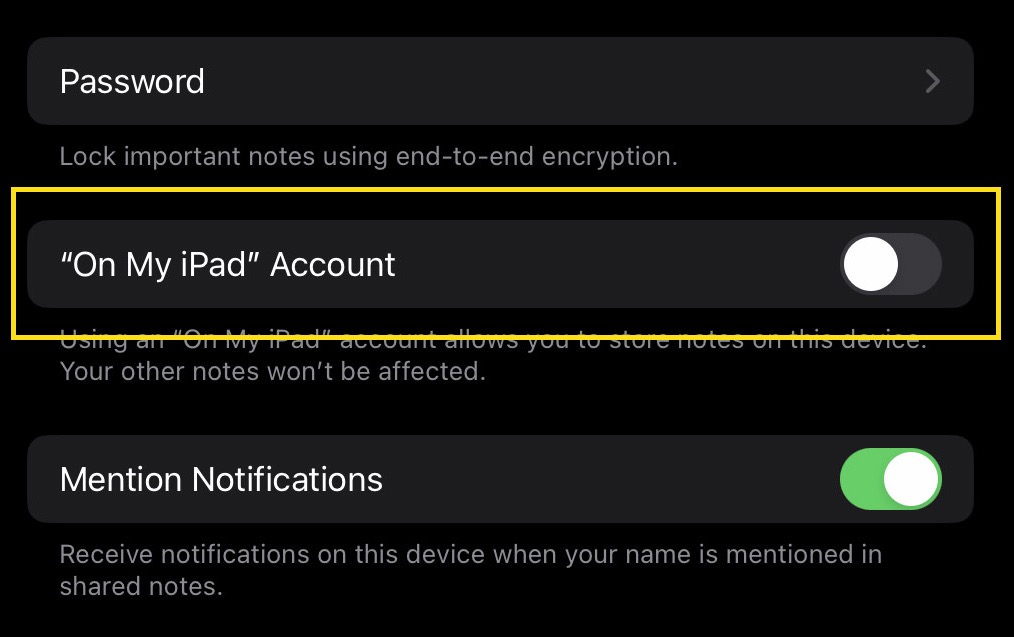
7. Keep Some Notes on Your Device Only
If you have iCloud enabled, typically, notes created on one device are accessible across all your devices. However, if you prefer to keep certain notes confined to a specific device, you can easily set this up.
To do so, navigate to Settings > Notes, and then enable the “On My Device” account. Once activated, new notes created will automatically be stored locally on that specific device-be it an iPhone or iPad-in a separate folder that will not be visible on your other devices.
8. Not Every Note Requires a Title
Apple Notes assumes the first line of any new note will be the title, displaying it in a larger font size. However, not every note you make needs a formal title.
If you prefer your notes to begin directly with the body text rather than a title, you can easily change this setting. Just go to Settings > Notes, find the ‘New Notes Start With’ option, tap it, and select your preferred starting point for your new notes.

9. Change Your Note’s Background
By default, the background color of your notes in Apple Notes matches your device’s settings. If your device is set to a dark background, your notes will appear dark as well. However, if you prefer a different look, such as a white background regardless of your device’s settings, you can customize this.
To make this change, go to Settings > Notes, then tap on ‘Note Backgrounds’. Here, you can select your preferred background color. This flexibility allows you to have a dark background on your device while keeping your notes in a bright, white background, or vice versa.

10. Share Notes with Friends and Family
Lastly, but not least, did you also know that you can share specific notes with friends, family, or even coworkers using Apple Notes? You have the option to either give them a copy of the current note or invite them to collaborate and edit the note together, similar to co-editing a document on Google Docs. Please note that the recipient needs to be using an Apple device to participate.
To share a note, simply go to the note you want to share, click on the share button at the top, and choose either ‘Collaborate’ to work on it together or ‘Send Copy’ to give them a static version of the note. You can then share it via AirDrop, Messages, Mail, or other available options.

The recipient will need to accept the note to view or edit it, ensuring both convenience and security in your collaborative efforts.