How to Fix Epson Printer Communication Error on Mac
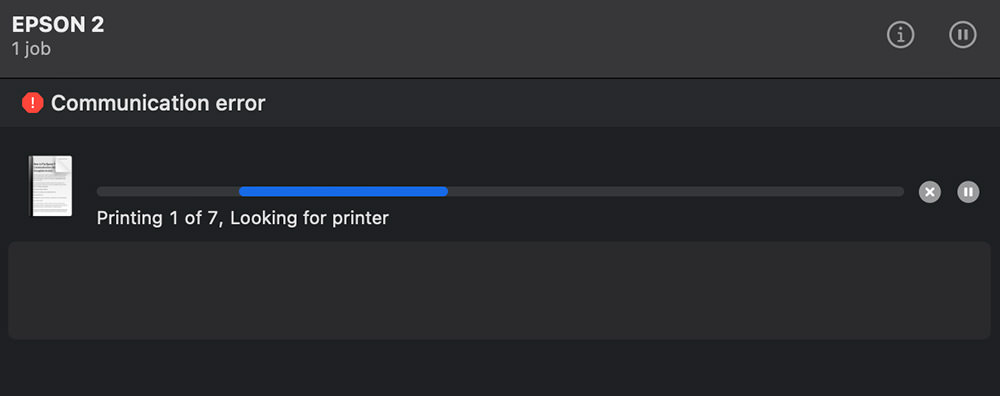
Recently, my Epson printer suddenly stopped working with a frustrating Epson printer communication error. Everything was fine until I tried printing – the printer would attempt to connect but then display a Communication Error message on my Mac.
What made this particularly puzzling was that the printer appeared to be properly connected – there was even a green status light showing in the Mac’s Printers & Scanners settings page.

When I ran a test print page, it worked perfectly fine.

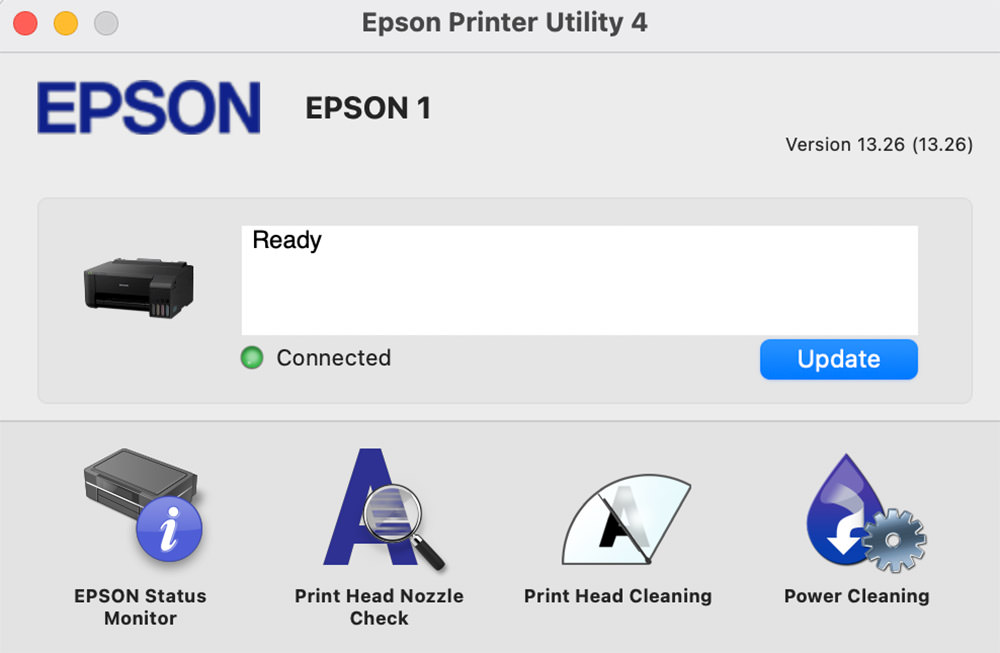
The Epson Printer Utility also showed that the printer was connected properly.
The issue specifically occurred when trying to print from applications like Notes, Pages, or Chrome. The Epson printer would attempt to connect but then display an Epson printer communication error message in the end.
In this article, I’ll walk you through my troubleshooting journey and share what I’ve done to try resolving this frustrating problem. We’ll explore the potential causes of the Epson printer communication error and, most importantly, how to fix each of them.
What Causes the Epson Printer Communication Error?
When your Epson printer displays a communication error, it means your Mac has trouble communicating with the Epson printer and cannot send files to print. Here are the common causes of Epson printer communication errors:
- Outdated or missing printer drivers – macOS updates sometimes break compatibility with older drivers.
- Wi-Fi or USB connection issues – the printer might be connected to a different network or the cable might be loose.
- macOS printer settings glitch – sometimes settings just get corrupted and need to be reset.
- Firewall or security software blocking communication – rare but possible if your firewall is strict.
- Printer unable to access local area network – this was the cause of my problem.
Now that we’ve covered the “why,” let’s move on to the actual fixes that worked for me (and should work for you too).
Quick Checks Before You Start
Before getting into the more involved fixes, there are a few quick things you should check. These might sound obvious, but trust me – I’ve skipped them before and wasted time troubleshooting something that just needed a simple reboot.
- Restart both your Mac and the printer. This clears out temporary glitches and often fixes the connection.
- Check all cable connections if you’re using USB. Make sure they’re snug and try a different port if needed.
- Make sure the printer and Mac are on the same Wi-Fi network. if printers are connected via wifi, make sure both copmputer and ptinert are on the same network,.
- Confirm the printer is powered on and not showing any errors on its screen (like paper jams or low ink).
- Try printing a test page from the printer’s control panel to rule out hardware issues.
If everything here checks out and it’s still not working, don’t worry – let’s get into the real fixes next.
Fix #1 – Reset the Printing System for Epson Printer on Mac
This was the first thing I tried, though it didn’t work for me, but it may work for you. Resetting the printing system essentially wipes all printer settings and gives you a fresh start.
Here’s how to do it:
- Go to System Settings (or System Preferences on older macOS versions).
- Select Printers & Scanners.
- Press Control + click (or right-click) in the list of printers on the left side.
- Choose Reset printing system…
- Click Reset to confirm.
- Once it resets, click the + button to re-add your Epson printer.
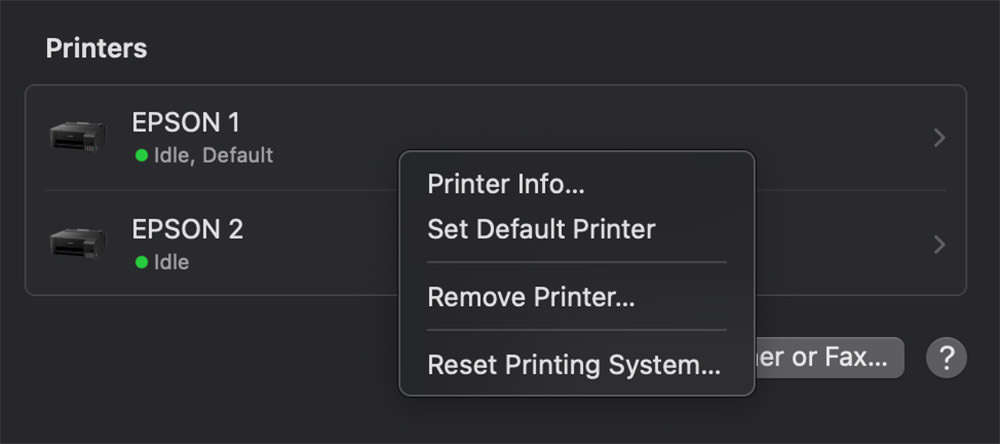
Heads-up: This will remove all printers you’ve added. You’ll need to re-add any other printers you use as well.
If this doesn’t work for you, try the next solution.
Fix #2 – Reinstall Your Epson Printer Driver
If resetting didn’t do the trick, it might be a driver issue. Try reinstalling the Epson printer’s driver.
Here’s what I did:
- Go to the Epson Support site.
- Enter your printer model and download the latest driver for macOS.
- On your Mac, open the Applications folder and look for any Epson software. If you see Epson Printer Utility or Epson Scan, uninstall them.
- Run the installer you just downloaded and follow the prompts to reinstall the driver.
- Once installed, go back to Printers & Scanners and add your Epson printer again using the + button.
Make sure when you re-add the printer, under the “Use” dropdown, it says something like Epson [Model] Series – not “AirPrint.” (Assuming your Epson model supports AirPrint.) If it says “AirPrint,” you’re not using the full driver, and that can cause problems.
After reinstalling, try printing a test page.
Fix #3 – Verify Epson Printer Settings on Mac
If the driver’s installed and it still won’t print, your Mac might be using the wrong settings. Sometimes settings can get unintentionally changed, so this is worth checking.
Check these settings:
- Open System Settings > Printers & Scanners.
- Select your Epson printer from the list.
- Click Options & Supplies.
- Go to the Utility tab and click Open Printer Utility.
- Check for any error messages or connection warnings.
Now go back to the main printer list:
- If you see multiple Epson printers, remove the ones you’re not using – especially if one says “Idle” or “Offline.”
- Make sure the correct driver is being used. Under the printer name, it should say something like “Epson [Model] Series” and not just “Generic PostScript Printer.”
Fix #4 – Reset Network Connection (Wi-Fi Models)
If you’re using a wireless Epson printer and getting the communication error, there’s a good chance it’s a network problem.
Reset the network settings on the printer:
- On the printer’s screen, go to Setup or Settings.
- Navigate to Network Settings.
- Select Reset Network Settings or Restore Default Network Settings.
- After it resets, go back and select Wi-Fi Setup.
- Choose your Wi-Fi network and enter the password.
Then, on your Mac:
- Go to Printers & Scanners.
- Remove the Epson printer if it’s already added.
- Click the + button to re-add it. Make sure the one you pick says “Bonjour” or “Epson [Model] Series.”
If you’re using a USB connection instead of Wi-Fi, try a different USB cable or port. That’s solved things for me before when I thought the printer was broken.
Once the printer is back on the right network, try a test print to see if it’s working.
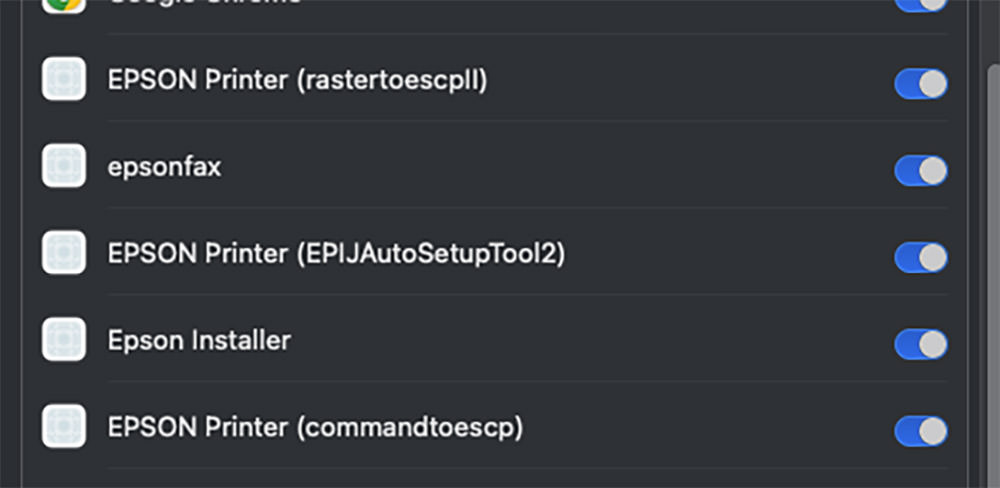
Fix #5 – Allow Printer to Access Local Network
And here we are – the fifth fix and the culprit that caused my printer to give that communication error message.
If your Epson printer is connected via Wi-Fi (like mine) but can’t communicate with your Mac, it’s likely blocked from accessing the local network. This typically happens if you accidentally clicked “Do not allow” when prompted about network access.
To check and fix network permissions:
- Open System Settings on your Mac
- Go to Privacy & Security
- Scroll down and select Local Network
- Look for any applications starting with “Epson” in the list
- Make sure the toggle switch is turned on for all Epson applications
After enabling access, try printing again to see if the communication error is resolved.
When to Contact Epson Printer Support
If you’ve tried all these fixes and your Epson printer communication error persists, you may need professional help. I researched through printer forums and Reddit for additional Epson printer solutions, though they didn’t resolve my specific issue.