How to Use the MutationObserver API for Tracking DOM Changes
Imagine this scenario: Rita, a magazine writer, is editing an article online. She saves her changes and sees the message “Changes saved!” Just then, she notices a typo she missed. She fixes it and is about to click “save” when she gets an angry phone call from her boss.
After the call, she turns back to the screen, sees “Changes saved!” shuts down her computer, and storms out of the office.
Apart from my poor story-telling skills, we can see from this short scenario the trouble that persistent message caused. To avoid this in the future, we should use a message that either prompts the user to acknowledge by clicking it or vanishes on its own. Using the latter for quick messages is a good idea.
We already know how to make an element disappear from a page, so that shouldn’t be a problem. What we need to know is when it appeared, so we can make it disappear after a reasonable time.
MutationObserver API
When a DOM element (like a message div) or any other node changes, we should be able to detect it. For a long time, developers had to rely on hacks and frameworks due to the lack of a native API. But that has changed.
We now have MutationObserver (previously Mutation Events). MutationObserver is a JavaScript native object with a set of properties and methods. It lets us observe changes on any node, such as DOM Element, Document, Text, etc. By mutation, we mean the addition or removal of a node and changes to a node’s attributes and data.
Let’s see an example for better understanding. We’ll first set up where a message appears upon a button click, like the one Rita saw. Then we’ll create and link a mutation observer to that message box and code the logic to auto-hide the message. Sound good?
Note: You might be thinking, “Why not just hide the message from inside the button click event itself in JavaScript?” In my example, I’m not working with a server, so of course the client is responsible for showing the message and can hide it easily. But like in Rita’s editing tool, if the server decides to change the DOM content, the client can only stay alert and wait.
First, we create the setup to show the message on button click.
<div id="msg"></div><br />
<button>Show Message</button>
var msg = document.querySelector('#msg'),
    SUCCESSMSG = "Changes Saved!";

/* Add button click event */
document
    .querySelector('button')
    .addEventListener('click', showMsg);

function showMsg() {
    msg.textContent = SUCCESSMSG;
    msg.style.background = 'teal';
}
Once we have the initial setup running, let’s do the following:
- Create a
MutationObserverobject with a user-defined callback function (the function is defined later in the post). The function will execute on every mutation observed by theMutationObserver. - Create a config object to specify the kind of mutations to be observed by the
MutationObserver. - Bind the
MutationObserverto the target, which is the ‘msg’divin our example.
(function startObservation() {
    // 1) Create a MutationObserver object
    var observer = new MutationObserver(function(mutations) {
        mutationObserverCallback(mutations);
    });

    // 2) Create a config object
    var config = {childList: true};

    // 3) Bind observer to the target
    observer.observe(msg, config);
})();
Below is a list of properties for the config object identifying the different kinds of mutations. Since in our example we only deal with a child text node created for the message text, we’ve used the childList property.
Kinds of Mutations Observed
| Property | When Set to true |
| childList | Insertion and removal of the target’s child nodes are observed. |
| attributes | Changes in the target’s attributes are observed. |
| characterData | Changes in the target’s data are observed. |
Now, let’s look at the callback function that gets executed on every observed mutation.
function mutationObserverCallback(mutations) {
    // Grab the first mutation
    var mutationRecord = mutations[0];

    // If a child node was added, hide the msg after 2s
    if (mutationRecord.addedNodes[0] !== undefined) {
        setTimeout(hideMsg, 2000);
    }
}

function hideMsg() {
    msg.textContent = '';
    msg.style.background = 'none';
}
Since we’re only adding a message to the div, we’ll just grab the first mutation observed on it and check if a text node was inserted. If we have more than one change happening, we can loop through the mutations array.
Every mutation in the mutations array is represented by the object MutationRecord with the following properties:
Properties of MutationRecord
| Property | Returns |
| addedNodes | Empty array or array of nodes added. |
| attributeName | Null or name of the attribute that was added, removed, or changed. |
| attributeNamespace | Null or namespace of the attribute that was added, removed, or changed. |
| nextSibling | Null or next sibling of the node that was added or removed. |
| oldValue | Null or previous value of the attribute or data changed. |
| previousSibling | Null or previous sibling of the node that was added or removed. |
| removedNodes | Empty array or array of nodes that were removed. |
| target | Node targeted by the MutationObserver. |
| type | Type of mutation observed. |
And… that’s it. We just have to put the code together for the final step.
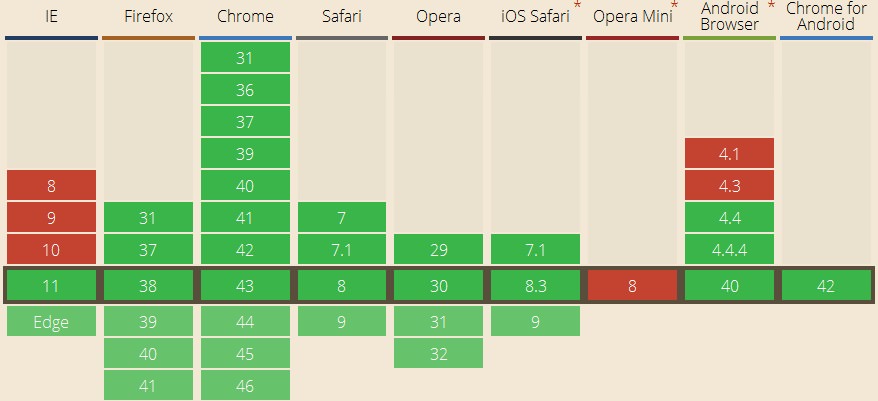
Browser Support

References
- W3C DOM4 Mutation Observer. W3C. Web. 19 June 2015
- MutationObserver. Mozilla Developer Network. Web. 19 June 2015.